I remember how intimidating it felt the first time I tried making homemade gluten-free pie crust. I needed a GF version for an apple pie I was asked to bring to a family gathering, but every recipe I tried ended up with me disappointed with how my pie crust turned out – gritty texture, strange aftertaste, or dough that wouldn’t cooperate. I knew there had to be an easier way to make a GF pie crust and make it taste great, too. After a lot of trial and error, I finally developed a buttery, melt-in-your-mouth, flaky gluten-free pie crust that works with any pie filling. I’ve spent hours perfecting it and troubleshooting along the way, and now I trust this recipe to turn out beautifully every time I make it

Recipe Highlights
- This crust mimics the taste and texture of a traditional pie crust, despite using only a handful of ingredients.
- This recipe makes enough for 2 single-crust pies or 1 double-crust pie.
- This crust always impresses my friends and family. They’ve told me before that they would have never guessed it was gluten-free if I hadn’t told them!
- This gluten-free pie crust can also be dairy-free and vegan with just a few simple ingredient swaps.
- This recipe is incredibly versatile and perfect for pies, tarts, and quiches.
Main Ingredients
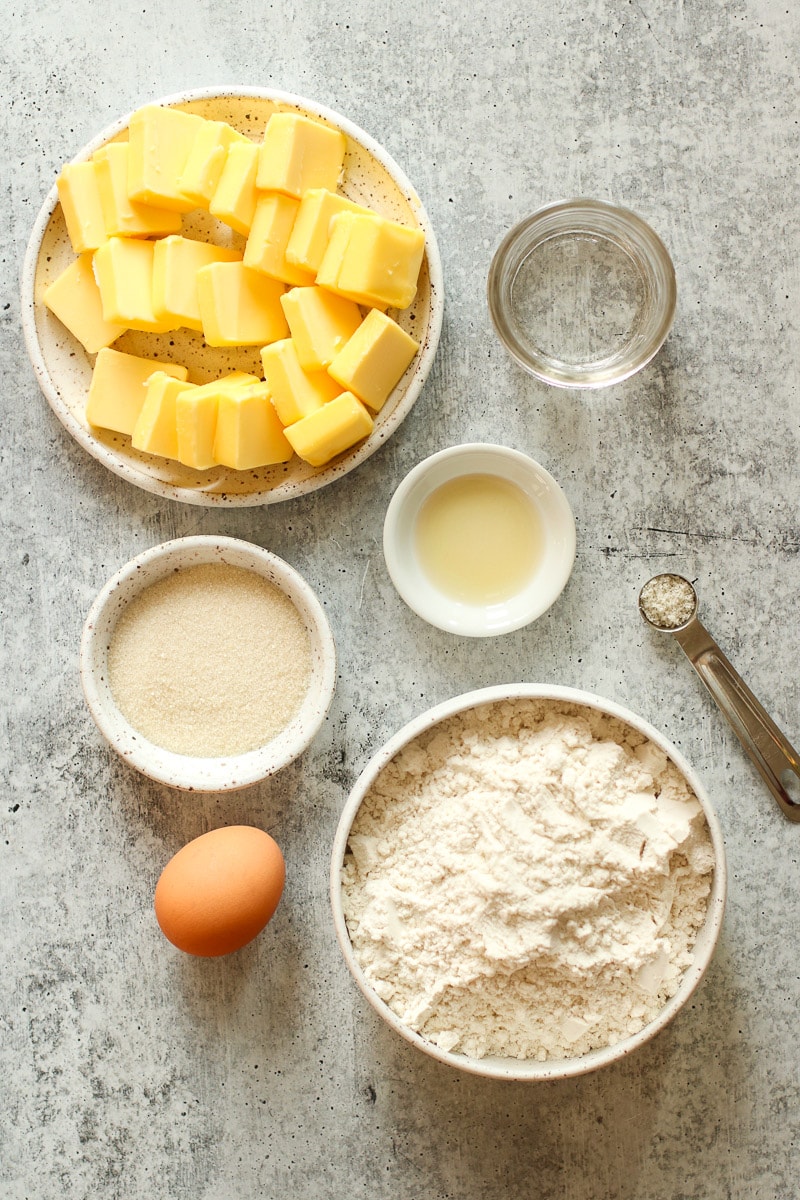
- Gluten-free flour: I use Bob’s Red Mill One-to-One Gluten-Free Baking Flour or King Arthur Measure-for-Measure Gluten-Free Flour. These are the best I’ve found in terms of GF flour for my pie crusts. For one, I’ve found that these 2 flours are by far the easiest GF flour blends to work with. Additionally, there’s no – or very little – grittiness when it comes to the textural outcome of the gluten-free baked crust, and there is no super strange aftertaste anyone has to be on guard for. This may be because both brands incorporate types of rice flour instead of cornstarch or tapioca starch as the main base ingredient.
- Butter: Use cold, unsalted butter (I’ll make my own if I have the time!), and cut it into slices.
- Sugar: A small amount of cane or raw sugar adds just a hint of sweetness to the crust.
- Apple cider vinegar: A dash of ACV helps gluten-free baked goods bake up to perfection.
- Egg: An egg helps create enough elasticity in the pie crust dough to give it the right texture and make it easy to transfer into the pie plate.
Find the ingredient list with exact measurements in the recipe card below.

Essential Baking Equipment
- Mixing bowl: I always opt for using a large-sized mixing bowl.
- Kitchen scale: I typically use a kitchen scale to weigh my flour instead of using the “scoop method,” which is where flour can become packed in the measuring cup. The “scoop method” can easily result in accidentally using too much flour, making my pie crust too dry and crumbly. I’ve found that with any gluten-free baking recipe, if I measure ingredients by weight, I know I have exactly the right amount – and it comes out great every single time.
- Rolling pin: This is key for rolling out the dough. That said, I’ve learned that if my rolling pin is MIA or isn’t clean, I can use a wine bottle to roll out my dough instead.
- Pastry cutter: Also known as a pastry or dough blender, this tool is crucial for helping “cut in” the butter to the flour. It is possible to make the recipe without this tool by using 2 butter knives to cut the butter into the flour, but I’ve found it usually takes more time and can be a bit of a hassle.
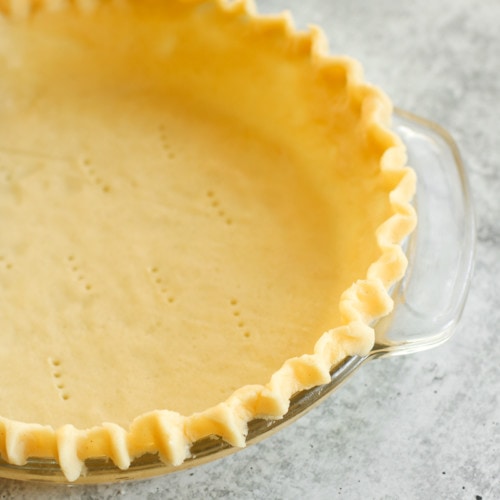
- Pie plate: A 9-inch glass pie plate works best, as it always gives me enough crust at the edges to flute (either crimped or wavy-style) or be able to cut out dough shapes for some extra decoration for the top of my pie. A 10-inch glass pie plate or a deep dish pie plate will work, too, but this will result in less ‘extra’ crust to work with for fancy edges and pie designs.
- Parchment paper: I always roll the pie crust out between 2 sheets of parchment paper. Not only does the parchment help flatten the dough to the right even thickness, but it also makes transferring the pie dough into the pie plate so much easier.


My Step-By-Step Instructions
These are the basic recipe instructions I use to make the best gluten-free pie crust:
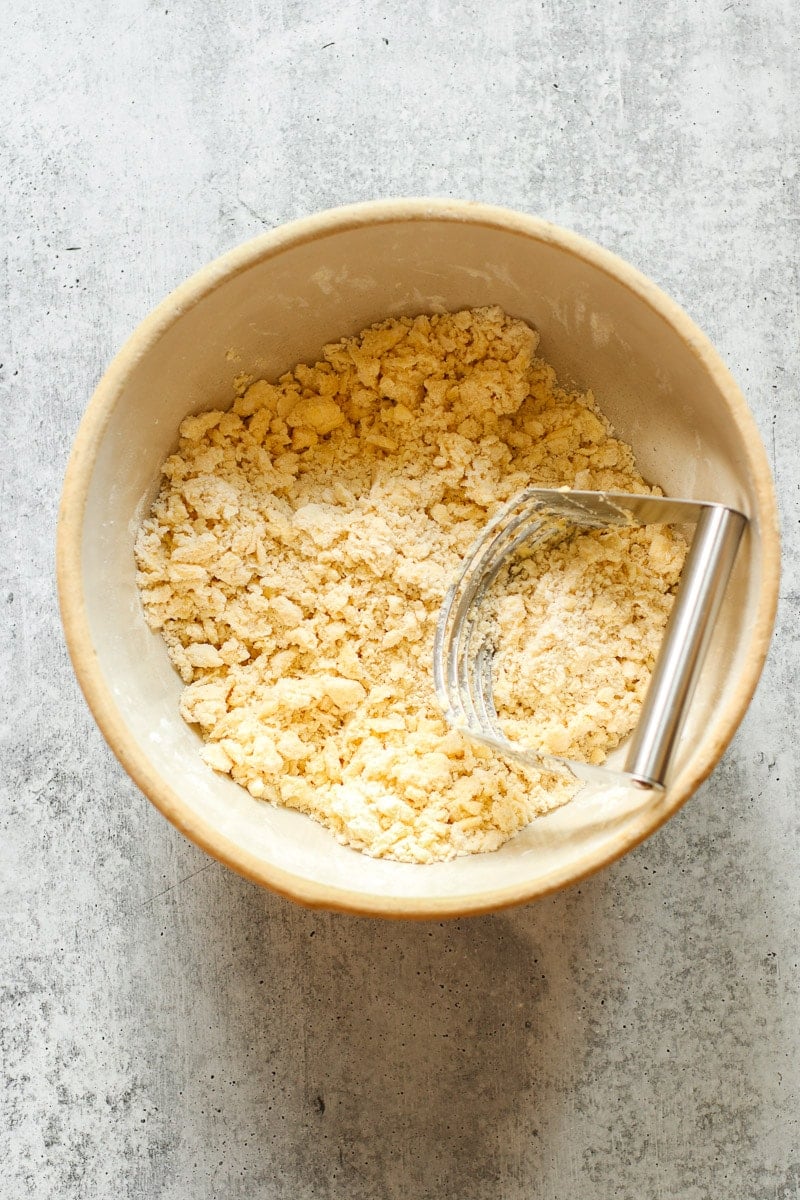
- In a large bowl, combine the flour and butter. Using a pastry cutter, cut the butter into the flour until the dough resembles a crumbly texture (the size of small peas).
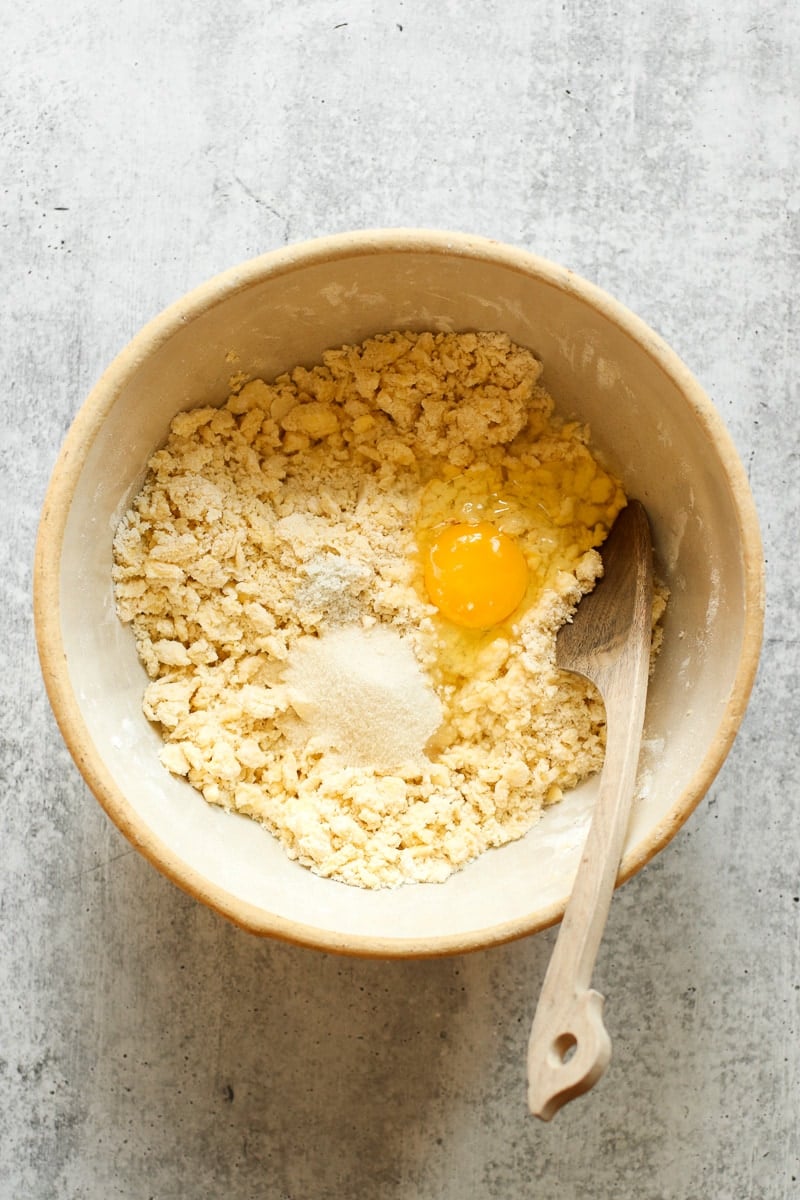
- Add the salt, sugar, vinegar, egg, and 2 tablespoons of water. Stir to mix, and then – with clean hands – continue to work the dough until it comes together to form a loose, large ball. It should stick together pretty easily. If not, add 1-2 teaspoons more water.
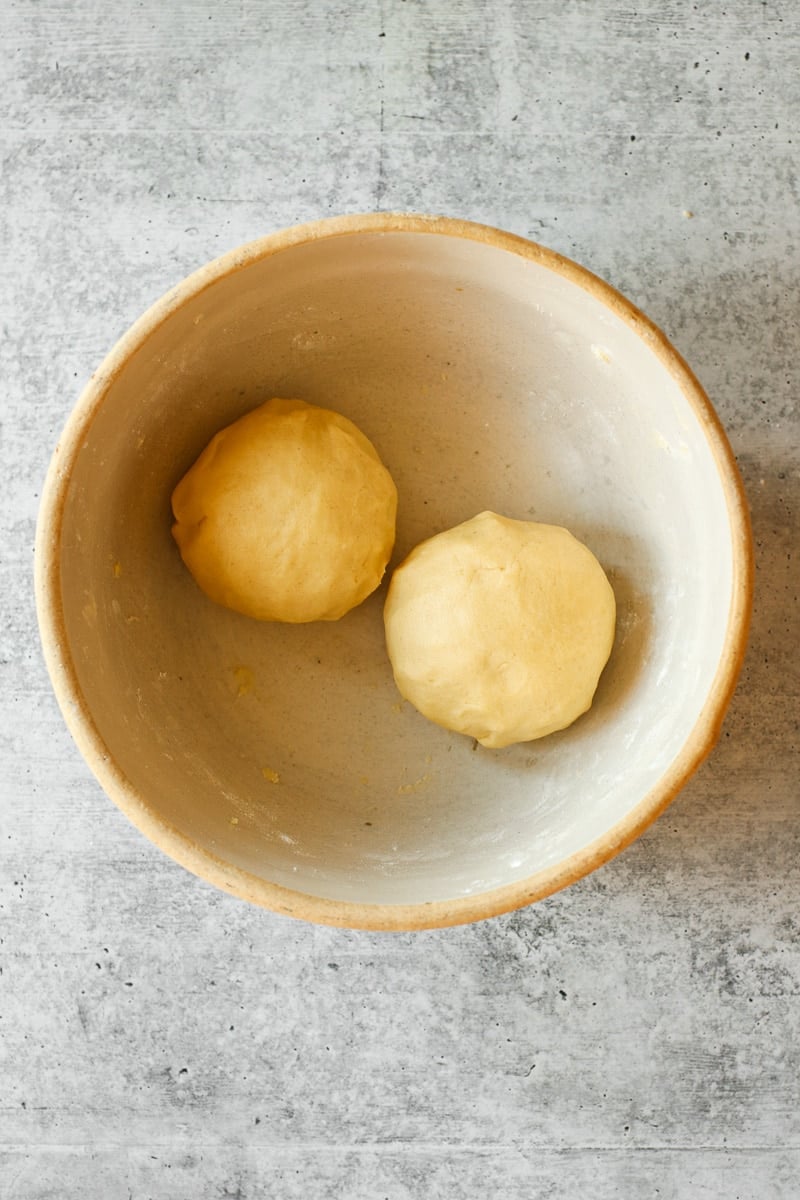
- Divide the dough into 2 equal parts and form each into a ball. Place 1 dough ball in the center of half of a large sheet of parchment paper.
- Fold the paper over and press down on the dough to form a disc. Wrap it up and place it in the refrigerator. Repeat with the second dough ball.
- Allow the dough to chill for 1-2 hours. If it is chilling for longer, allow it to set at room temperature for 30-60 minutes before rolling it out.
To roll out the dough:
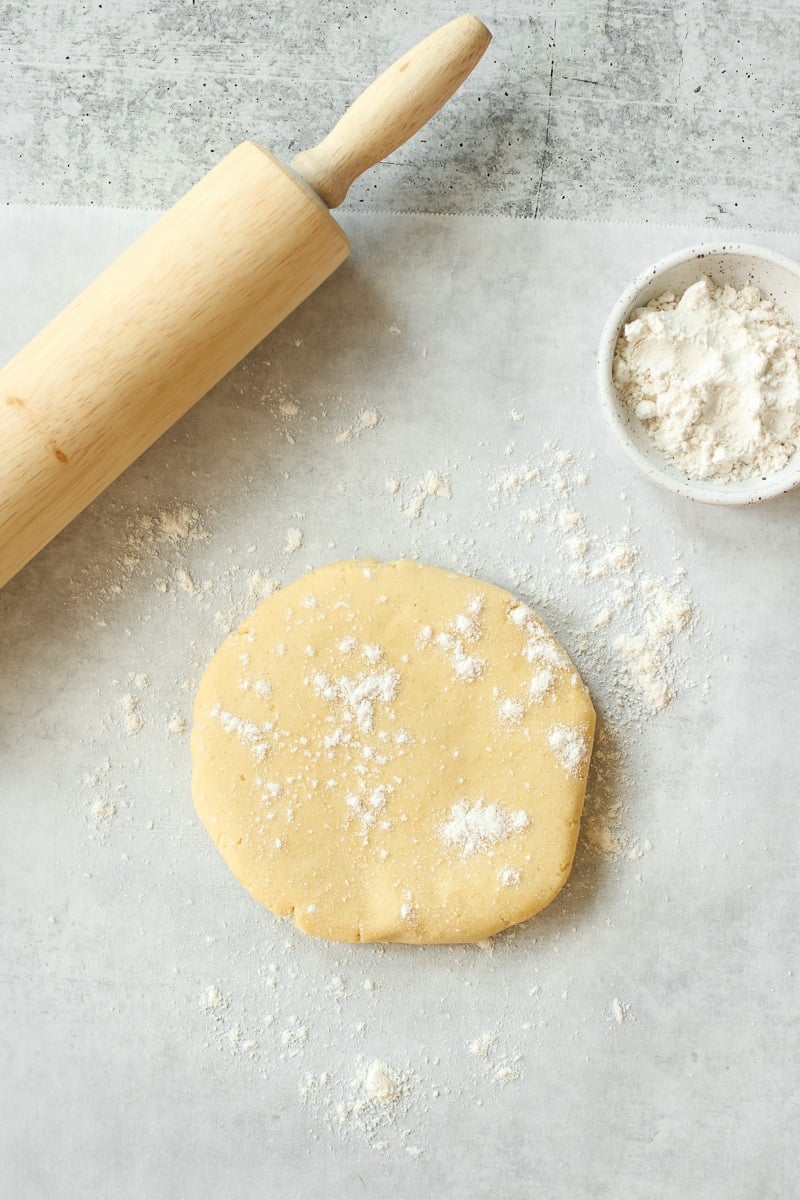
- Remove the dough from the parchment paper and dust the paper lightly with flour. Place the dough back onto the center of the parchment paper, and dust the top of the dough lightly with flour now. Cover with another sheet of parchment paper.
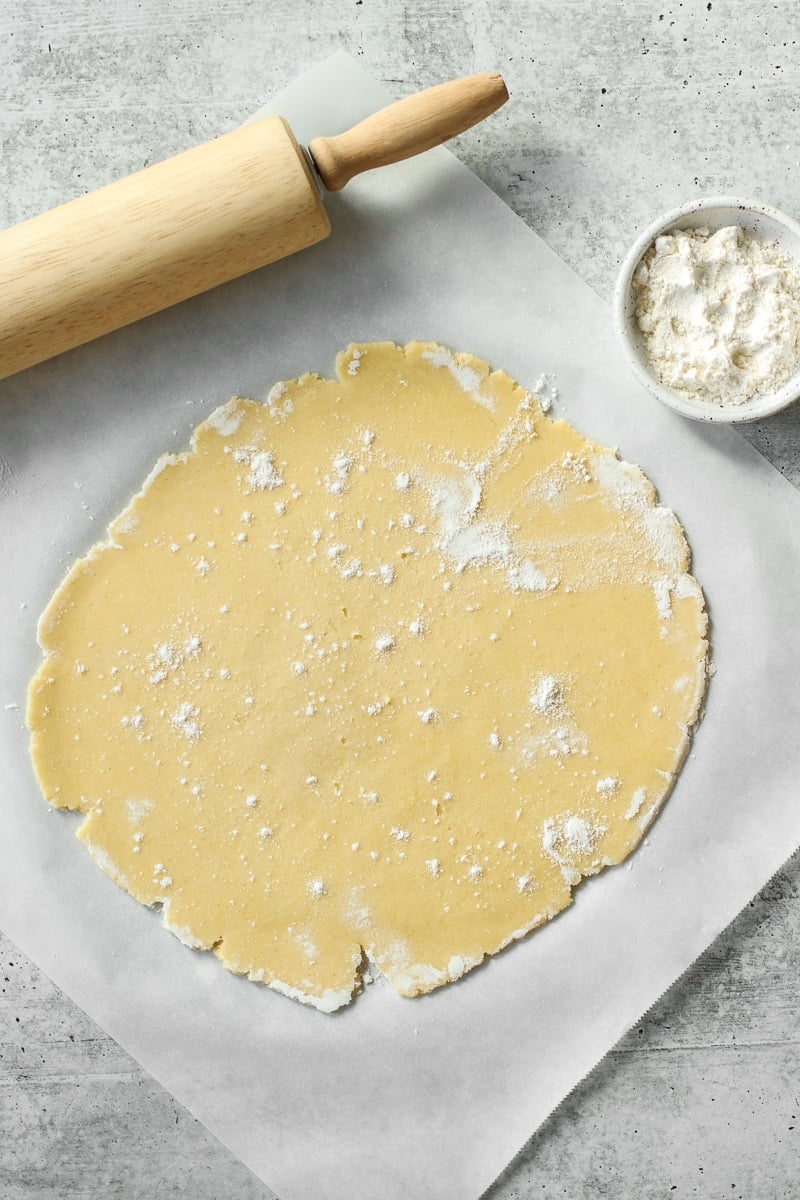
- Using a rolling pin, roll the dough into a ⅛-¼” thick round crust. If the dough starts to stick to the parchment paper, repeat the light dusting process with flour.
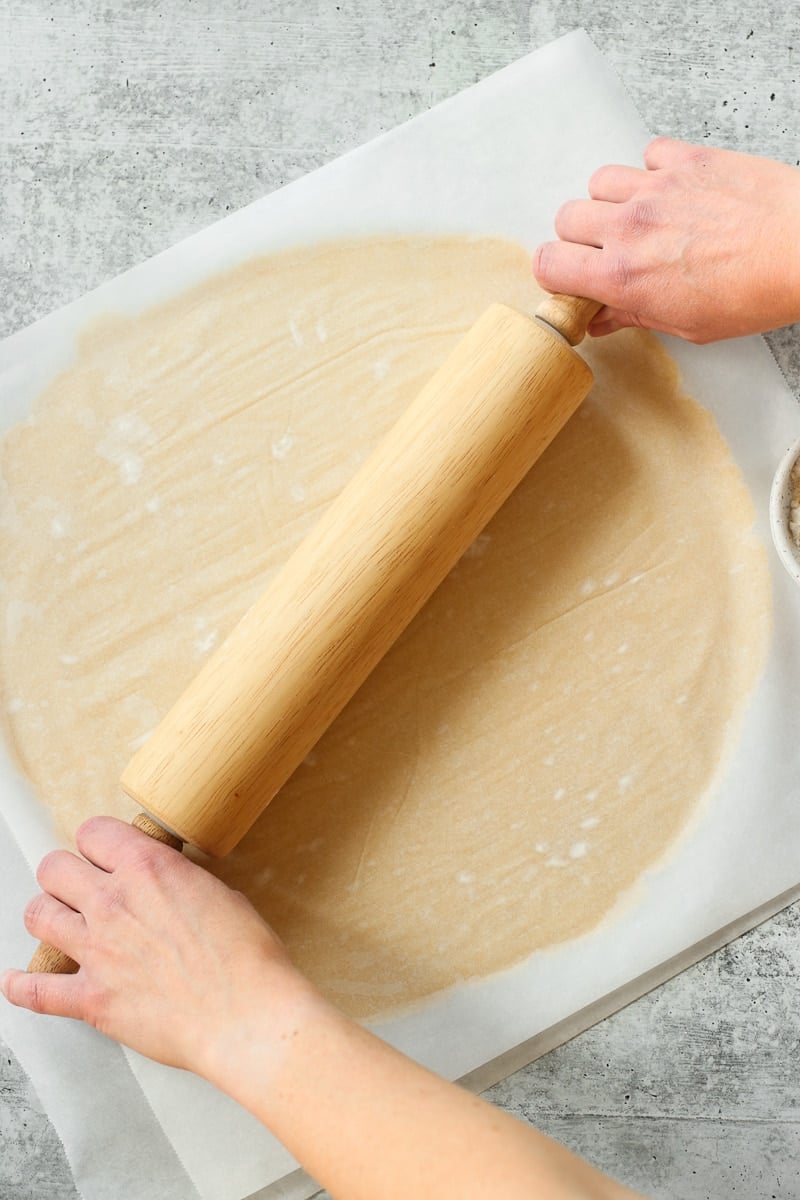
- Carefully remove the top parchment paper. Slide hand under the bottom layer of the parchment paper and carefully flip the dough over into the pie plate.
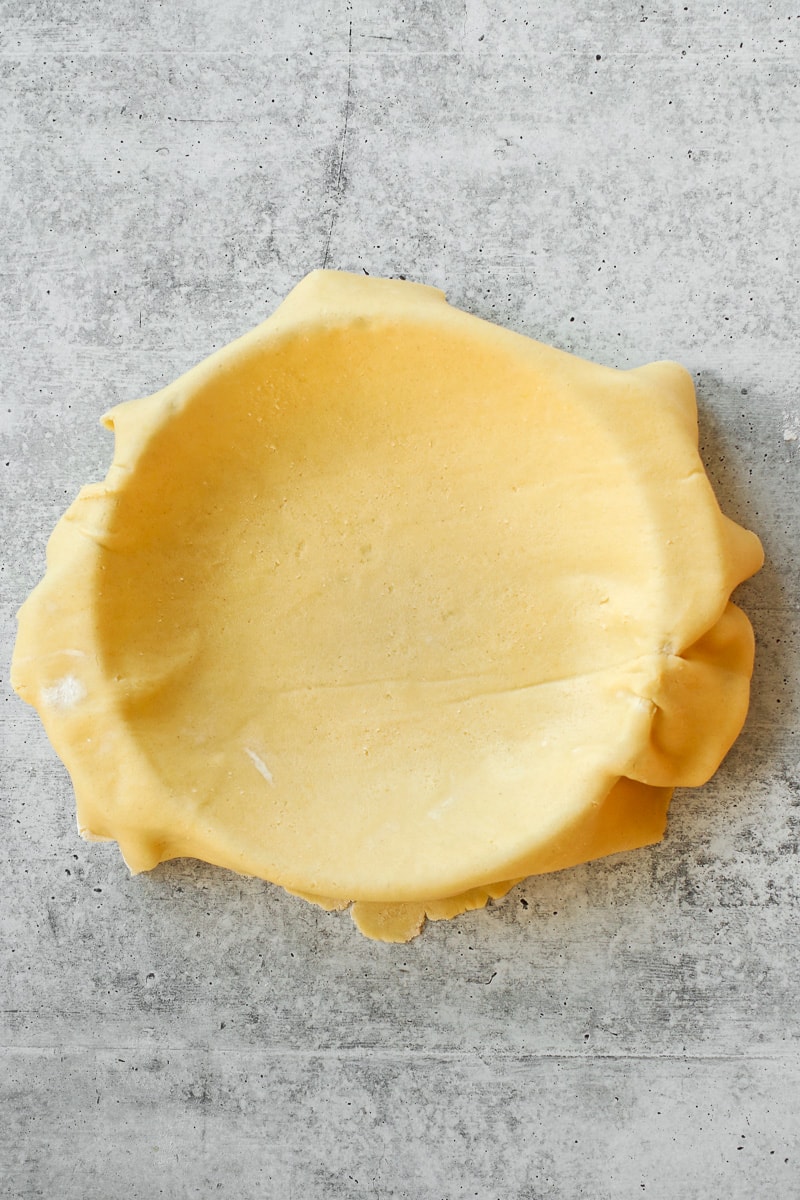
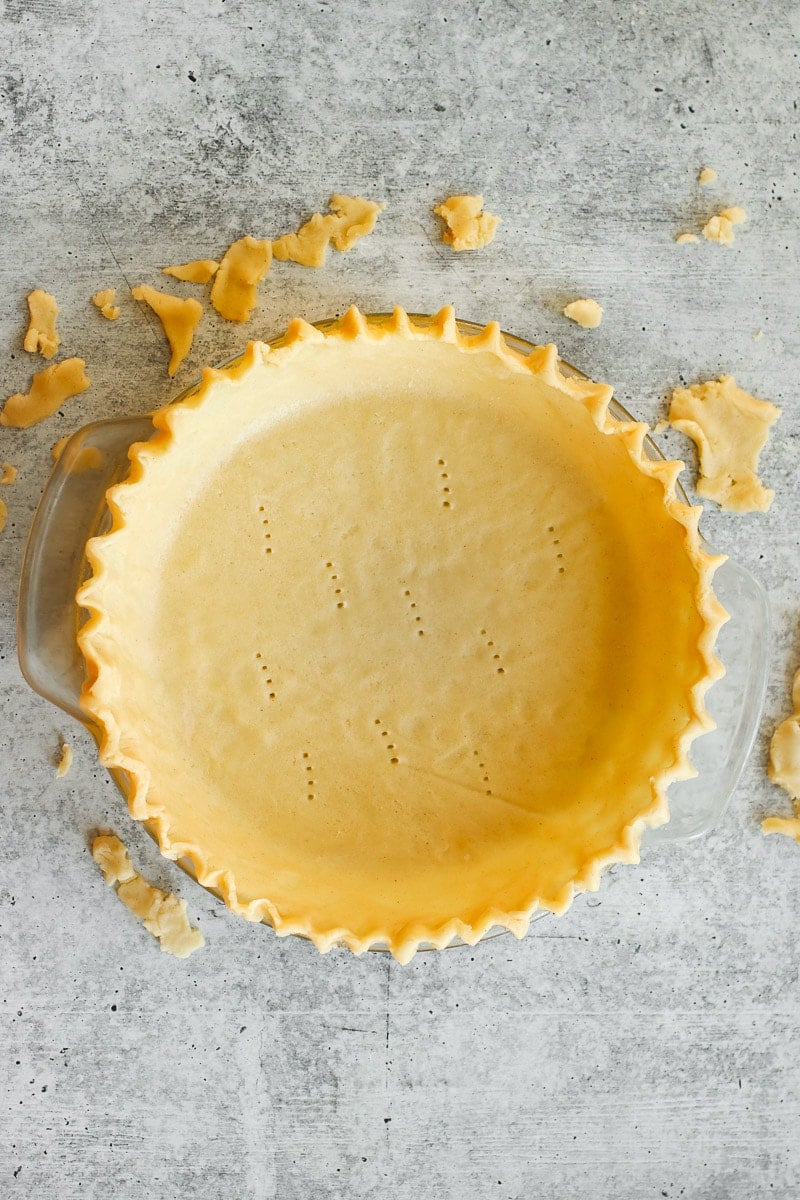
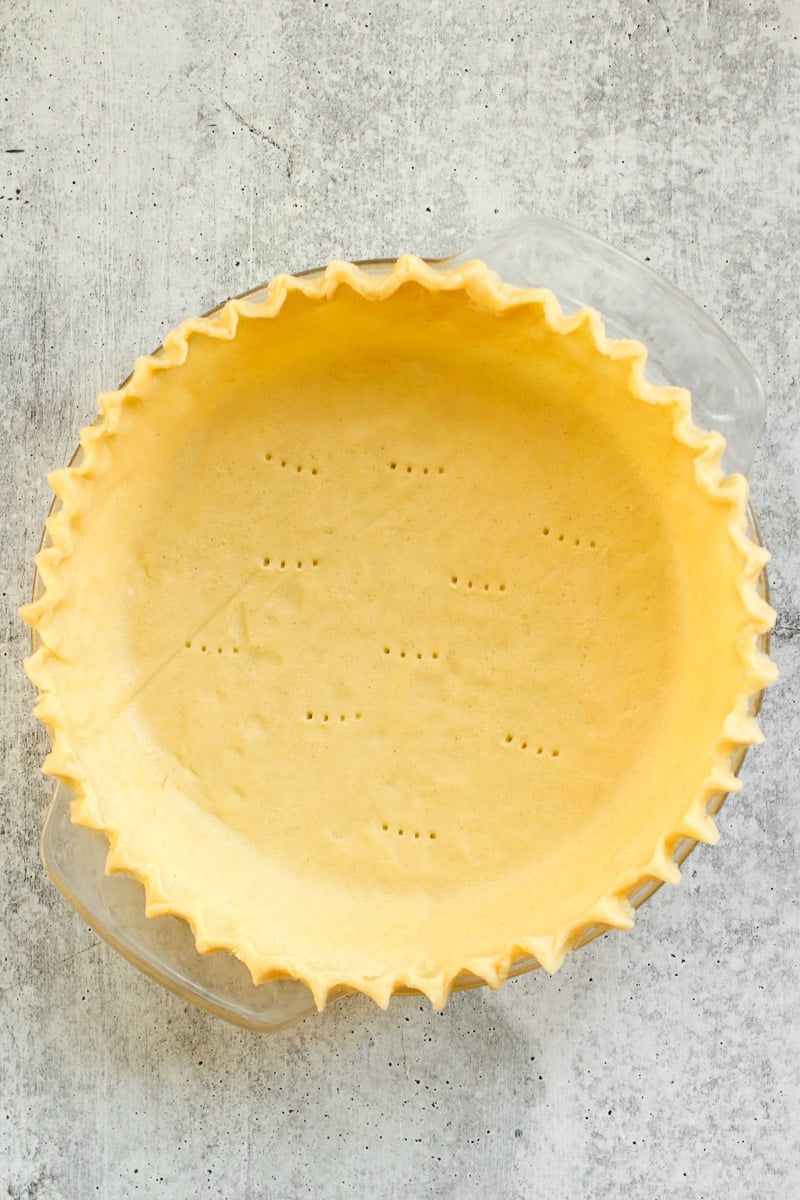
- Carefully remove the remaining parchment paper from the dough. Gently press the dough into the pie plate, trim the excess dough from the edges, and leave enough to create a thick edge. Fill in the thinner spots as needed with the excess dough.
- Add a decorative pattern to the edge, if desired, such as a fluted edge.
- Press a fork 5-6 times into the bottom of the pie crust. This will help the pie crust stay flat and not bubble up when baking or pre-baking.
For serving size and the complete directions and ingredient amounts, scroll down to the recipe card below. All of our recipes include the nutrition analysis, listing calories (kcals), protein, carbohydrates/carb, fiber, sugar, sodium, cholesterol, and more per serving.
One Of Our 5-Star Reviews ⭐⭐⭐⭐⭐
“I used it [this recipe] to make a pumpkin pie and a turkey pot pie, both with AMAZING results. Nobody could tell it was a gluten-free crust! The first time I used Cup4Cup flour, and the second time I used Bob’s Red Mill One-to-One GF Baking Flour. Both tasted great, but Bob’s was easier to work with. I’m not even going to try looking for a different pie crust – this is my go-to for LIFE!”
– Amy
Troubleshooting The Dough
When perfecting my gluten-free pie dough, I had to address dryness, excess moisture, and dough sticking to the parchment paper during the rolling process. Here’s what I’ve found fixes these issues when I run into them.
If It’s Too Dry
I know if my pie dough is too dry if it cracks, crumbles, or doesn’t come together easily when I roll it into 2 ball shapes. The culprit here is likely too much flour. However, I’ve learned that this can be easily corrected. If this happens, I simply add one tablespoon of cold water at a time until the dough forms a nice, smooth ball, as pictured above.
If It’s Too Wet
On the flip side, I know I need to add more flour if my dough is too wet and won’t hold a dough ball. To fix the dough being too watery, I add 2 tablespoons of gluten-free flour at a time until the dough easily forms into a smooth ball.
Flute Pie Crust Edges Like A Pro
When I first began my journey in pie-making, it was hard enough knowing where to start when baking a homemade pie, let alone fluting the edges and making it look pretty. “Fluting” is when the pie crust is formed to create a scalloped or wavy-style edge that gives the pie a little extra design and character.
I found this tutorial on fluting the edge very helpful. It explains how to crimp the edges of pie dough easily and quickly before the baking process. After practicing a few times, I realized that it’s not as intimidating as it looks – and if I can get the hang of it, I’m convinced that anyone can!

Make It Dairy-Free
To make the pie crust dairy-free, I simply replace the regular butter with one of my favorite plant-based butter alternatives, such as Earth Balance or Plant-Based Country Crock. I always make sure to use stick butter and not spreadable butter, though, since the water content in the 2 forms varies and can affect the final outcome of the crust. (I’ve learned the hard way that this small detail makes a big difference.)
Make It Vegan
To make the pie crust vegan, I replace the regular butter with a plant-based or vegan butter alternative, such as Earth Balance or Plant-Based Country Crock, and omit the egg. Since I’m taking out the egg, I need to make a “sans egg” to allow the dough to still have some of the elasticity it needs. (Otherwise, the pie crust may end up having small cracks or breaking into pieces.) To do this, I use an additional ¼-⅓ cup of cold water in place of the egg, and then slowly add the water in until the dough reaches the right texture.
Storage Options And Tips
I love that I can make this gluten-free pie crust up to 4 days in advance and keep it in the fridge until I’m ready to use it. I wrap the dough in parchment paper, press it into a disc shape, and keep it in the refrigerator for up to 5 days. When I’m ready to use it, I let the dough sit at room temperature for 30 minutes before rolling it out. Unbaked dough will also freeze well for up to 3 months. I’ve tested 2 methods that both work extremely well.
Freezing The Dough Discs
I make the pie dough balls, flatten them into 2 discs, wrap each one in plastic wrap (to ensure they don’t dry out), and store them in a freezer-safe container. The dough discs will stay fresh for up to 3 months. When I’m ready to use one of the pie discs, I thaw it in the fridge overnight or on the counter for 15-30 minutes until it’s thawed just enough to roll out. I’ve found that pie crust is much easier to roll out and transfer to a pie pan when it’s still cold rather than when it’s room temperature or warm.
Freezing The Dough In A Pie Plate
After pressing the dough into my pie plate, I wrap it (plate and all) in plastic wrap so the crust doesn’t dry out. Then, I freeze the pie crust – raw, not par-baked – for up to 3 months. When I’m ready to use it, I let the pie dough sit at room temperature for 30 minutes and then par-bake the crust before I fill it.

How I Use This Pie Crust
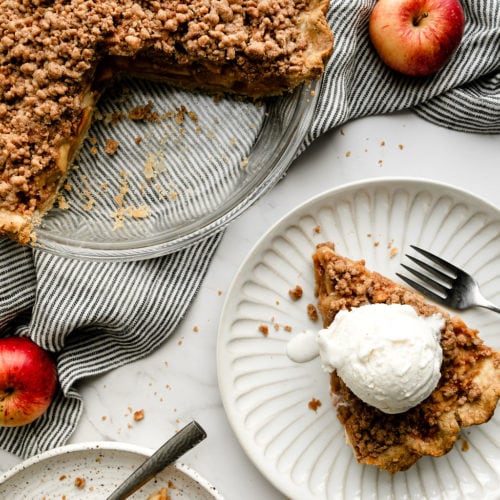
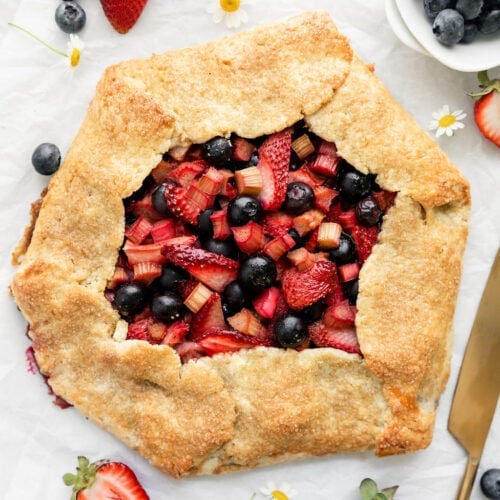
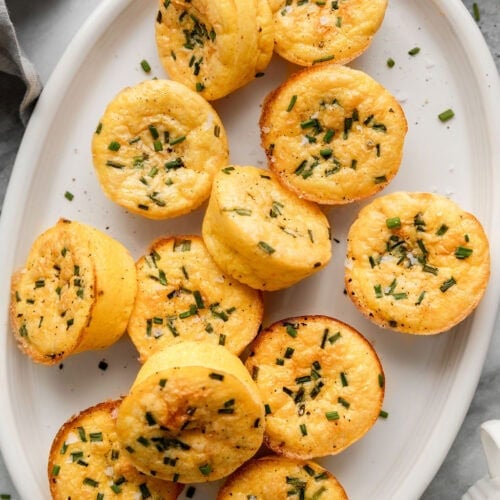
I love how versatile this gluten-free pie crust recipe is. I can use it for so many of my favorite crust-based recipes, including pumpkin pie, Black and Blueberry Pie, tarts, and even savory dishes like quiche or turkey pot pie. It’s important that I always make a note to myself – whether it’s mental or physically written down – that if I make double-crusted pie recipes, like chicken pot pie, I need to make enough gluten-free pie dough for both the bottom crust and the top crust. However, if I’m just sticking to making single-crust pies, there’s no need to worry about this extra step (or making any extra GF dough).
Frequently Asked Questions
Par-baking or “blind baking” the pie crust is recommended for most pie recipes because it helps keep the crust flaky and prevents it from getting soggy when the pie filling is added. Here’s how I par-bake my gluten-free pie crust:
1. Preheat the oven to 375 degrees.
2. Before baking, poke the bottom of the dough a few times with a fork. This will help the bottom of the pie crust to stay flat while baking without bubbling up.* Ceramic pie weights also work great for keeping the bottom of the pie crust weighted down during par-baking.
3. Bake the unfilled crust for about 15 minutes or until the edges are lightly golden.
*Note: The dough may still bubble up a small amount, but it will deflate back to normal while cooling.
Using cold butter in a pie crust is crucial because it creates a flakier texture. When little chunks of butter are baked cold, they generate steam pockets that elevate and separate the layers of the dough, resulting in a pie crust with a light, buttery, and flaky texture.
Pie filling should naturally thicken, no matter the type of starch or flour mixture used. However, if I notice a fruit-based pie I make seems to have a lot of juice, I try to let it cool extra or even overnight. If it’s super runny, I may consider adding a little bit of gluten-free corn starch.
Yes, an egg wash on a gluten-free pie crust can help it achieve a beautiful golden-brown color when baked. However, this is an optional step, not a necessary one.
Making a gluten-free pie crust from scratch is difficult sometimes, especially if I’m short on time and need one quickly. Fortunately, store-bought versions of gluten-free crusts are easier to find due to rising awareness of gluten sensitivities, such as celiac disease. Most grocery stores now have gluten-free pie crusts in stock that you can buy.
Wholly Gluten Free Pie Shells is one of my top choices of gluten-free pastry dough when I need a GF pie crust fast. There’s also a King Arthur Gluten-Free Pie Crust Mix (dry ingredients only) available on Amazon. The ingredients include rice flour, potato starch, cane sugar, salt, xanthan gum, and a vitamin and mineral blend. Of course, depending on when the mix is ordered, you may not be able to get this GF crust option as quickly as you need it.

Want to save this recipe?
Enter your email below & we’ll send it straight to your inbox. Plus you’ll get great new recipes from us every week!
Gluten-Free Pie Crust Recipe
This easy, flaky, buttery gluten-free pie crust pairs wonderfully with any filling. It’s made with simple ingredients and has become my reliable go-to recipe for both sweet and savory pies.
Ingredients
- 2½ cups gluten-free flour blend*
- 1 cup (2 sticks) cold, unsalted butter, cut into ½-inch thick slices**
- ½ teaspoon fine salt
- 2 tablespoons sugar
- 1 teaspoon apple cider vinegar***
- 1 large egg**
- 2 tablespoons cold water
Instructions
To make the dough balls:
- In a large bowl, combine the flour and butter.
- Using a pastry cutter, cut the butter into the flour until the dough resembles a crumbly texture and is about pea-sized.
- Add the salt, sugar, vinegar, egg, and 2 tablespoons of cold water. Stir to mix.
- With clean hands, continue to work the dough until it comes together, forming a loose, large ball. The dough should stick together pretty easily. If it does not, though, just add 1-2 teaspoons more of cold water.
- Divide the dough in half and form each portion into a ball (you’ll have 2 dough balls).
- Place each ball in the center of a large sheet of parchment paper.
- Fold the paper over and press down to form a thick, round disc and wrap it up.
- Repeat steps 6-7 with the other dough ball.
- Place the wrapped dough balls in the refrigerator to chill. If you only want to make a single-crust pie, wrap one of the dough discs tightly with plastic wrap and place it in the freezer to save for a future pie.
- Chill the dough discs at least 30 minutes or up to 2 hours. If chilling longer, you will need to allow the dough to set at room temperature for 15-30 minutes before rolling it out.
To roll the dough out:
- Remove the dough from the parchment paper and dust the paper lightly with flour.
- Place the dough back onto the center of the parchment paper and dust the top of the dough lightly with flour.
- Cover with another sheet of parchment paper.
- Using a rolling pin, roll the dough into a ⅛ to ¼-inch-thick round disc. If the dough starts to stick to the parchment paper, add more gluten-free flour as needed.
To transfer the first pie crust into the pie plate:
- Remove the top parchment paper.
- Mist a 9-inch pie plate with nonstick spray and place it upside down over the pie crust.
- Gently slide your hand under the bottom layer of parchment paper and quickly – but gently – flip the pie plate and crust over so it is right side up.
- Carefully remove the remaining parchment paper from the dough.
- Gently press the dough into the bottom and sides of the pie dish.
- Use a knife to remove any excess dough hanging over the pie plate’s edges, leaving enough to create a thick edge.
- Add a decorative pattern to the edge of the dough, if desired, such as a fluted edge.
- The crust is ready for filling or par-baking.
Last Step! Please leave a review and rating letting us know how you liked this recipe! This helps our business thrive so we can continue providing free recipes and high-quality content for you.
Notes
*This equates to 325 g of King Arthur All-Purpose Gluten-Free Flour or 360 g of Bob’s Red Mill One-to-One Gluten-Free Baking Flour if you’re using a kitchen scale instead of the “scoop method.”
**To make this recipe dairy-free, replace the regular butter with a plant-based butter alternative, such as Earth Balance or Plant-Based Country Crock.
To make this recipe vegan, omit the egg and replace the regular butter with a plant-based butter alternative, such as Earth Balance or Plant-Based Country Crock. Since you’re taking out the egg, you’ll need to make a “sans egg” to allow the dough to still have some of the elasticity it needs. To do this, use an additional ¼-⅓ cup of cold water in place of the egg. Slowly add the water in until the dough has the right texture.
***May substitute white vinegar.
Nutrition Information
- Serving Size: 1/8 of 1 pie crust
- Calories: 175
- Fat: 12 g
- (Sat Fat: 7 g)
- Sodium: 241 mg
- Carbohydrate: 16 g
- (Fiber: 2 g
- Sugar: 1 g)
- Protein: 1 g
- Cholesterol: 39 mg
Dietary
For ultimate success, we highly recommend reading the tips in the full blog post above. All photos and content are copyright protected. Please do not use our photos without prior written permission. If you wish to republish a recipe, please rewrite the recipe in your own unique words. Link back to the source recipe here on The Real Food Dietitians. Thank you!
I used this pie crust for a Chicken Pot Pie and my daughter said it was delicious. I will only be using this recipe whenever I make a sweet or savory pie. Thank you for sharing.
We appreciate the 5-star review, Lisa!
Hi ..is there a reason you don’t mix the egg, vinegar and water before adding it to the flour ? With regular non gf crust I always use the recipe with vinegar and egg, but always mix it together before adding to the flour. Just curious isms it makes a difference 🤔
Hi Lorraine, we’ve found that we can skip that step and still get great results!
Oh my gosh!!! I haven’t had a decent pie crust since 2013, then I made this crust. It is as close to a regular pie crust as you can get!!! The only thing I changed was I grated my butter on the largest size hole of my grater. I did have to add extra water to my crust. I started by adding 1 teaspoons at a time as the recipe suggested. I ended up adding 4 teaspoons of cold water. The crust was flaky and held up when rolling it out. No cracking! I made a mini apple pie and a mini blackberry pie. Each pie took approximately 3 days to eat and the crust did not get soggy!!! With the leftover crust I did what my mom used to do, I cut the remaining dough in strips, spread a thin layer of butter over the dough, then sprinkled with cinnamon and sugar. I baked the leftover dough for 15-20 minutes and I baked the pies for 40-45 minutes. This summer we will be having Straberry Pie and I will be using this crust recipe!! This will be the only pue crust recipe I use from here on out!! THANK YOU!
We appreciate this kind feedback, LeAnn! Thanks so much for the 5-star review!