Ingredients
- 2 cups all-purpose flour, plus more for rolling (use gluten-free flour, if needed)
- 1 tablespoon baking powder
- 1 tablespoon granulated sugar
- 1 teaspoon fine salt
- ¼ teaspoon baking soda
- 6 tablespoons cold unsalted butter, plus more for brushing the tops after baking
- ¾ cup milk of choice (I recommend whole or 2% dairy)
- ½ teaspoon white vinegar
Instructions
- Preheat the oven to 425℉. Lightly mist a baking sheet with cooking spray or line it with parchment paper; set aside.
- To a mixing bowl, add the flour, baking powder, sugar, 1 teaspoon salt, and the baking soda; whisk together to combine.
- Using a box grater, grate the cold butter into the flour mixture. If you don’t have a box grater, you can cut the cold butter up into very small pieces with a knife. Just be sure to work quickly and handle the butter as little as possible to prevent it from melting.
- Use a fork or pastry blender to work the grated butter into the flour mixture until it resembles coarse crumbs. TIP: Avoid using your hands to mix, as this can cause the butter to melt and will not give you the fluffiest biscuits.
- Make an indentation (or “well”) in the center of the flour mixture. Pour the milk and vinegar into the well and stir until a soft, craggy dough forms (rough and uneven with some lumps). NOTE: Not all of the flour will be incorporated into the dough.
- Turn the dough and any loose bits of flour out onto a lightly floured flat surface.
- Use your hands to quickly pat the dough into a rectangle that is 1-inch thick.
- Working quickly, fold the rectangle of dough in half and then press it into a rectangle again.
- Repeat this fold-and-press process 4 more times. By now all of the flour should be incorporated into the dough but the dough won’t be perfectly smooth (and that’s okay!)
- Shape the dough once again into a rectangle that is 1-inch thick. This is the final shaping. Use your hands or a bench scraper to make the edges tidy.
- Use a bench scraper or sharp knife to cut the dough into 8 squares.
- Place biscuits on the prepared baking sheet, spacing them 1 to 2 inches apart.
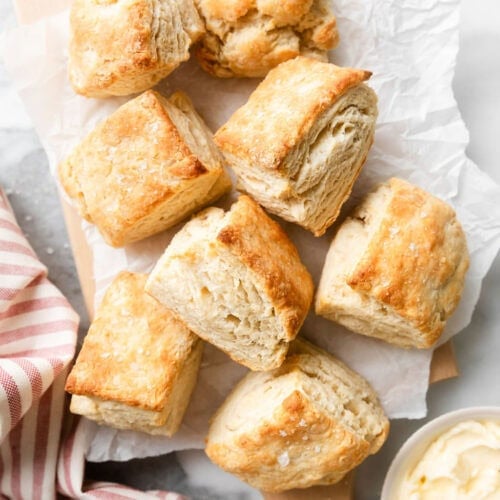
- Bake the biscuits for 12-13 minutes or until the tops are a very light golden brown.
- Remove the biscuits from the oven and rub the top of each biscuit with a pat of cold butter if desired (I highly recommend not skipping this step!) Serve the biscuits warm.
- Store leftover biscuits in an airtight container at room temperature for up to 3 days.
Notes
For gluten free, use an equal amount of 1:1 gluten-free baking flour, such as Bob’s Red Mill 1-to-1 gluten-free baking flour. Note that gluten-free biscuits will rise slightly less and have less browning, but they still taste great. Bake them for 1 minute longer, 13-14 minutes total.
To Refrigerate The Dough And Bake Later: Prepare the biscuits through Step 11 in the recipe above. Place the unbaked cut-apart biscuits in a large airtight container, separating layers with parchment paper. Or, place the unbaked biscuits on a baking sheet and wrap the entire baking sheet with plastic wrap. Refrigerate the biscuits for up to 4 days. When it’s time to bake, remove from the fridge and arrange the biscuits on a parchment-lined baking sheet (if they’re not already on one) and allow the biscuits to rest at room temperature while you preheat oven to 425℉. Bake for 12-13 minutes or until biscuits are golden brown on the bottom and lightly browned on top.
To Freeze The Dough And Bake Later: Prepare the biscuits through Step 12, placing the unbaked biscuits on a parchment-lined baking sheet. Refrigerate the biscuits on the baking sheet for 30 minutes. Then, transfer the unbaked biscuits to a freezer-safe airtight container or a zip-top freezer bag. Freeze chilled biscuits for up to 1 month. When it’s time to bake, remove the biscuit pucks from the freezer and arrange them on a parchment-lined baking sheet. Allow biscuits to rest at room temperature while you preheat oven to 425℉. Bake for 12-14 minutes or until biscuits are golden brown on the bottom and just very lightly browned on top
Baker’s Notes: The above options are excellent methods if you want make-ahead convenience. However, the biscuits may not rise as much as they do when you bake them right away but they are still very delicious tender biscuits. When refrigerating or freezing ahead, mine have a very slight crunch to the outside but the insides are still flaky and tender.
Nutrition Information
- Serving Size: 1 biscuit
- Calories: 202
- Fat: 10 g
- (Sat Fat: 5 g)
- Sodium: 472 mg
- Carbohydrate: 25 g
- (Fiber: 1 g
- Sugar: 3 g)
- Protein: 5 g
- Cholesterol: 24 mg
